
We overcame big challenges | Lekker Update #5 | PART 2/2
May 28, 2020
Calder
This Lekker update was so huge that I ended up splitting it into 2 main topics. There's just too much to share here and I hope you have the time to go through it.
The 2 topics are:
- Lekker Edition business-side update
- Lekker Edition project-progress update
This is the Lekker Edition project-progress update. I follow up on all the topics from the previous update and share some new insights. I recommend you read everything in chronicle order, but you can skip parts that you're already familiar with.
- Logistics
- Assembly factory
- The Lekker switch?
- PCBA development
- Wooting two mold
- The Timeline
If you want to read the Lekker Edition business-side update first, you can find it here.
Logistics
Let's start this update with something light and simple. Worldwide, logistics is plagued with longer shipping times and premium prices. There's still less transport traffic (supply) and increasing demand for space. Transport by sea freight is still the only consideration. I will keep an eye on the rates and once we get into manufacturing, I can reevaluate.
Assembly factory
In the previous blog, I went over a list of reasons why we decided to move to a new assembly factory. We were still negotiating the terms with the parties involved, these are now concluded.
The Wooting two Lekker Edition uses our original Wooting two bottom-case mold which is at our previous assembly factory. Ideally, you'd open a new product design with a new factory partner, but this project is focused on technology. Not a new product design.
This makes the situation a bit tricky when moving from a manufacturing partner. Even though we completely own all our molds, you still need to get some type of indirect permission from the factory to cooperate. Otherwise, it becomes a real mess, real quick.
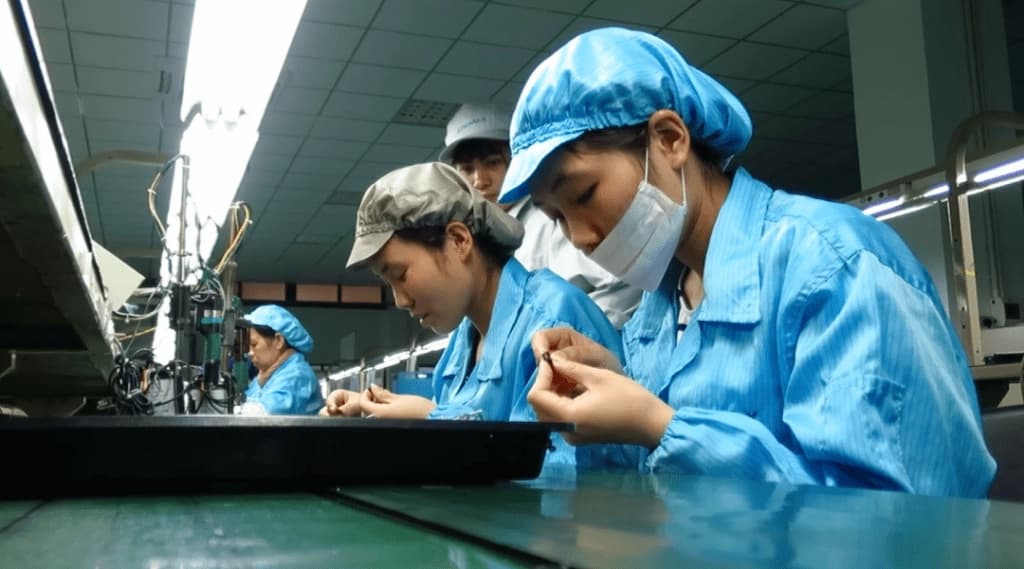
Thankfully, our previous manufacturer has good intentions and understands our decision under one condition. That we keep the bottom-case mold at their factory and they'll function as the plastic injection factory instead of the assembly factory. This is in both's benefit, as it should make the project run smoother. They have experience with the parts and also indirectly play a role in another part of this update.
This means we were able to move forward with our decision. It will become relevant once we're closer to trial production.
The Lekker Switch?
I'm going to start from the beginning and build up to where we are now. You might be a new passenger on this journey and it's important you understand the underlying value of this project and why we started making the Lekker switch.
You can read in detail the journey of starting the Lekker switch. A blog I wrote that'll set the right tone.
In short, in 2018 I started exploring other input technologies for analog input because we were hitting technical limitations with the Flaretech switch. Wooting has to make continuous progress.
The exploration brought me to Hall effect switches, something that only a few manufacturers were working on behind the scenes. After probing around with different suppliers, we ended up talking with Huano. A switch manufacturer of all kinds, perhaps known for their mouse switches.
Huano had a magnet switch in development for essentially digital input. For us, it was an opportunity to transform them into analog input switches by modifying a few things.
We decided to keep an eye on the developments since we were heads deep into the Wooting two with only little spare time.
Over time, I learned that more manufacturers were planning to make Hall effect switches (for digital input). This was good news because we could focus on what we're good at, not bother too much with the switch development and eventually choose between different Hall effect switch suppliers.
We did not want to become a switch maker and compete with other switches out there. But that quickly changed when I realized that these developments were not heading into a desirable direction. Proprietary hardware, closed eco-systems, poor designs, no guarantees, slow development, you name it.
From my viewpoint, other than making progress with analog input, the goal of these new Hall effect switches should be to open the market and make analog input technology accessible. This would mean that the switch maker has to be independent of brands or assembly factories, build a uniform design, and is open to selling switches separate.
After all, we want to make analog input keyboards an industry standard.
This is when we decided to take things into our own hands and create the Lekker switch with Huano. We would not be able to satisfy all the goals, but we would be able to make the switch and technology accessible.
Throughout 2019, we started to focus more-and-more on the Lekker switch with a technology-first approach. We wanted to make the technology solid and left the hardware part to the switch maker.
When we finally revealed our developments with a Lekker switch keyboard prototype at Computex 2019, we realized, we were able to go 100% for it. This also shifted our focus more on the hardware aspect. We became a lot more critical, took much more careful consideration, and started to learn how things worked. We didn't want this to be a quick fix, this had to last, we had to build our future on these switches.
In hindsight, this was already the most critical turning point for this project.
The original design (gen1 switch) had a 4-hook design that made it impossible to hot-swap, required force to install, and was impossible to pluck out with a tool. I started to do... what I always do when I get serious. Ask a lot of questions, learn, and challenge the supplier.
I wanted to open a completely new mold for the switch bottom-case that included a lot of improvements compared to gen1. Including hot-swap, nylon material, and sound-dampening bumps.
This entire process of communicating, design, and decision making took a lot of time. We even went to their factory at that time. That's also when I learned that the assembly machine is closely tied into the switch design and the most critical part.
I went into more depth about this in a different Lekker update, look for "The Switch" heading. You can also see how it's made from our switch production vlog.
I was able to get to an agreement with the switch maker (Huano) to make all the changes. This required a new switch bottom-case mold and tooling (jigs) for the assembly machine. A major delay was in order, but it was for an overall better product.
The sample mold was made and I received the first switch samples before Chinese New Year (CNY) for review. It was a solid, already proven design, and the samples showed no issues. I expected to kick it all off soon after CNY.
Then COVID-19 came along as a curse and a blessing.
The virus caused CNY holidays to extend and factories remained closed. Even when Huano opened the doors again, it was with limited capacity and, more importantly, their tooling/mold employees were stuck in Hubei area. The epidemic center.
At first, this was considered a schedule setback. But as time passed, it became clear that Huano's priorities started to shift. The alarm bells went off when they asked us to use the gen1 switch for this production. I kindly declined and asked to provide a new schedule. This was not long before I posted the previous update.
That's when I immediately set an alternative plan in motion. A plan I had considered before, but couldn't resort to at that time and kept in mind in case it was necessary.
If you're familiar with the industry, you'll understand that we can't simply move the switch design to a different manufacturer. We don't own the entire design, the assembly machine is completely tied into the design, and opening a new switch design takes a long time.
Instead, I was left with only one option. Completely step away from Huano and work with a different switch manufacturer. This has huge implications on the product, but we're now closer to production than before.
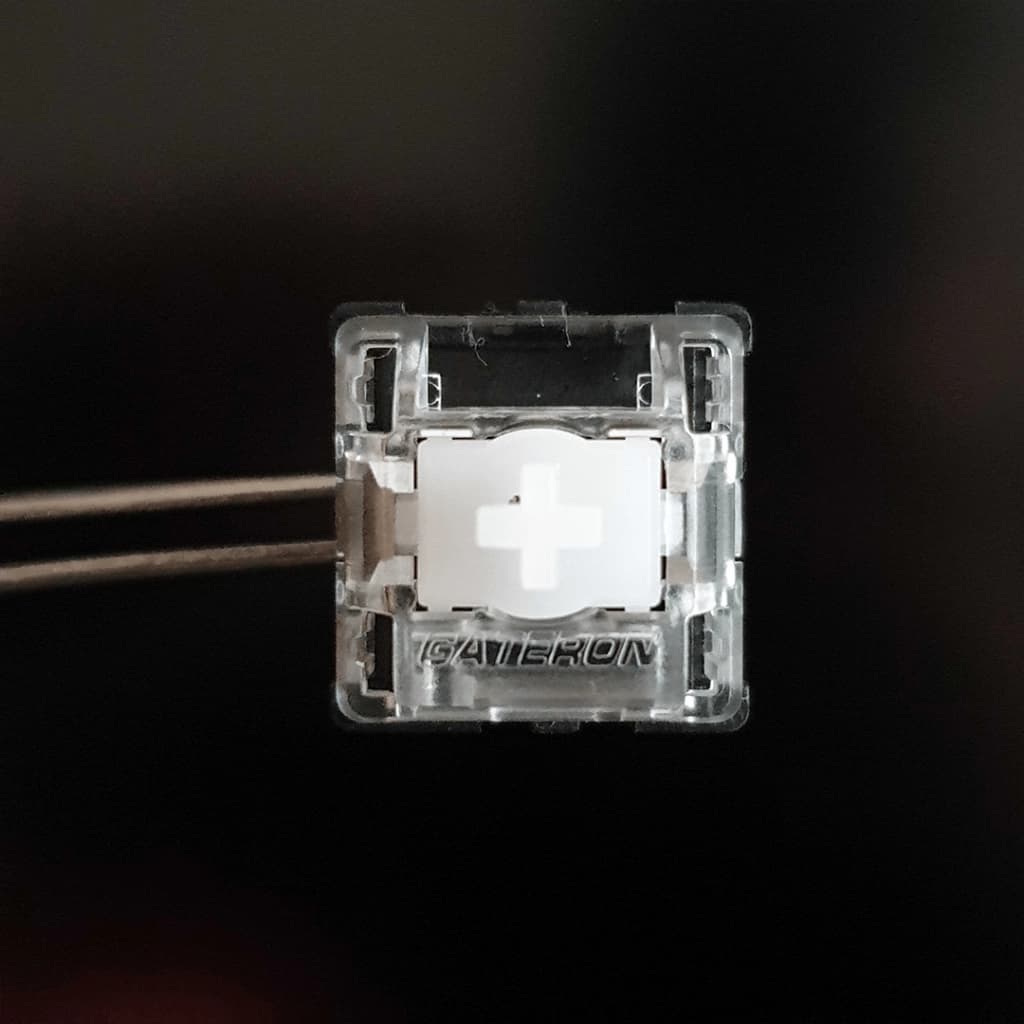
The different switch manufacturer is Gateron.
Gateron had spent the last years developing its magnet switch. When we were midst development with Huano, they were still under contract, and considering the timeline and route we had chosen, this was not an option before.
Starting this year, circumstances changed. We decided to test the Gateron magnet switches.
It wasn't much later that we received word from the Huano owner himself... They decided to focus all their resources on their current switch offering and at this time did not want to continue with further changes to the switch. Leaving our option to only the gen1 switch.
This wasn't a complete surprise. During the development, I've seen signs that Huano's resources were stretched out. They tried their best to continue development but I think COVID-19 put a lid on it. Regardless of the consequences, I can't blame them and have to respect their decision.
This is also a blessing. If we would continue with gen1 or even with the new switch design, what would this mean for the future of the switch? If at any later moment Huano had decided to pull the plug, or not to put all their effort behind it. it could have hurt us badly in the long run. Better strip that bandaid now that we can still make changes.
Besides, I really can't accept gen1. This can be done better.
But Lekker switch?
Does that mean it's the end of Lekker switch?
Absolutely no.
- Priority one: We needed to make progress with analog input technology.
- Priority two: I didn't want this to be exclusive, and make it more accessible for 3rd parties and hobbyists.
This is why we started the Lekker switch. But did we lose any of that with the Gateron switch? I don't think so.
Gateron is an experienced, high-quality switch maker. They're increasingly popular in the enthusiast market and are also on many commercial keyboards. Including making semi-custom switches. The company owner is very ambitious, careful, and sharp. He understands the underlying value of the Hall effect switch and is not in a rush.
The Gateron switch is also a hall effect type switch, and technology-wise functions exactly the same as the Lekker (Huano) switch. It just has a different mechanism. This means we're still able to get all the same features.
The magnet switch, Hall effect sensor, PCBA design and firmware are all part of the Lekker Edition development. The Lekker (Huano) switch was piece of the puzzle, but not the entire puzzle. We have spent an awful lot of time on the Lekker switch and we're basically leaving that behind us in favour of the Gateron switch.
Kill your darling. But it wasn't in vain. We learned an a lot about producing switches and what makes them tick. And we couldn't have come this far without the Lekker (Huano) switch.
So, It'll be a Gateron switch with the Gateron brand. But we're looking into changing the stem color to a Lekker color with a heavier spring (65cN). That conversation is happening soon. It wasn't our highest priority at the time.
More important was to make sure that it all works with the Wooting two Lekker Edition first.
Gateron magnet switch
If you noticed, I keep referring to these switches as magnet switches. The reason is that the switch itself is not complete without its hall sensor. Only when you couple the two, do you have a Hall effect switch. Otherwise, it's a switch with a magnet inside.
I like to make this distinction because one magnet switch isn't exclusively for one Hall effect sensor. It's the combination of both that determines the quality of a Hall effect switch. In our case, we still use the same sensor as we did with the Lekker switch. For an other brand/company, they will use a different sensor.
Let's take a closer look at the Gateron magnet switch.
At first glance you'll notice:
- It uses a swan-shaped click system
- 2 plastic pins are sticking out from the bottom
- It looks sexy
- Share a secret, the magnet is in the center
The switch is incredibly smooth, doesn't wobble much, and radiates a solid design. In fact, Huano's switch isn't able to compete in quality. But there's also a fundamental difference.
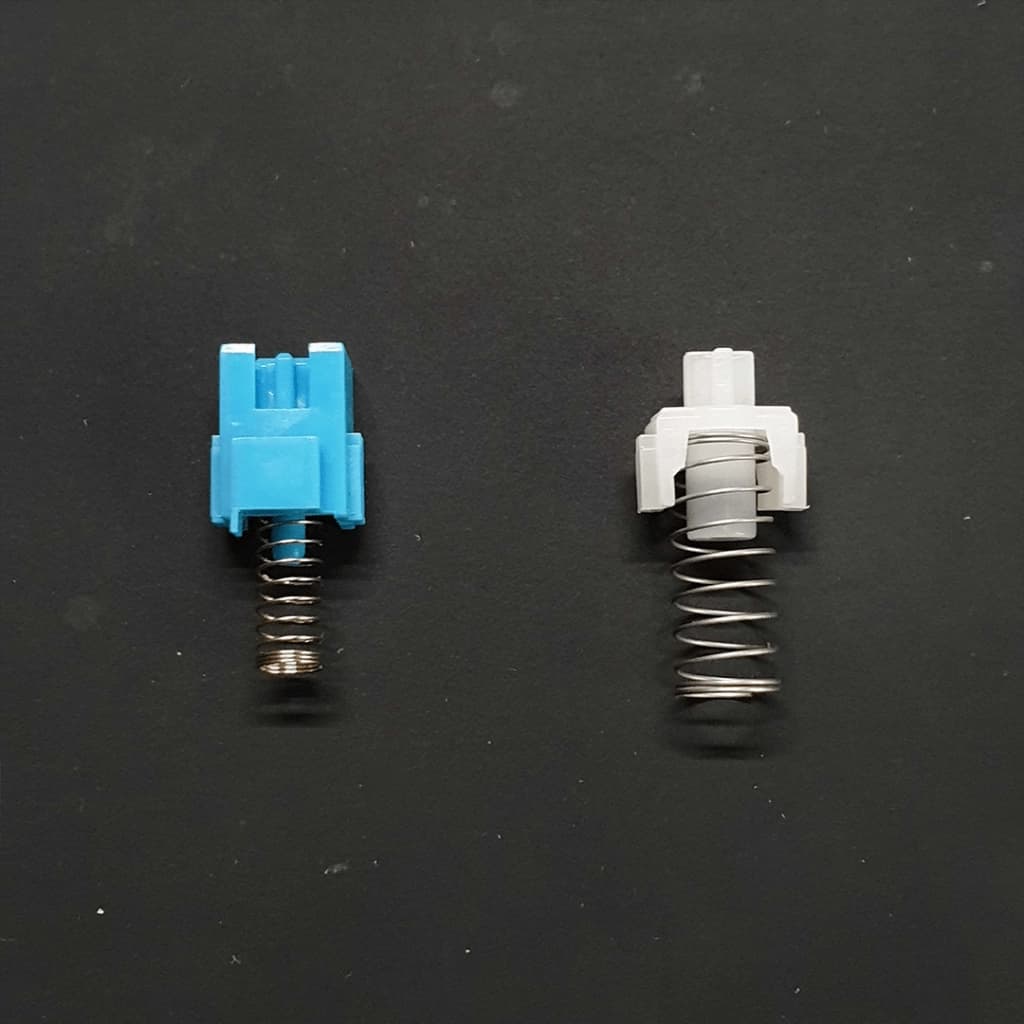
The magnet position is at the center of the switch and floors the bottom, leaving no space for any components underneath the switch. The Huano switch had the magnet positioned on the front-facing side and left space for components underneath the switch.
This has major implications for the PCBA design because we can't assembly all the components on the PCB top surface anymore. Instead, we need to assembly everything on the PCB bottom surface.
Over the last month+, Jeroen and Kevin worked tirelessly on making the "switch". I have a huge amount of respect for their work and their creative process. You're in for a ride, get ready for this.
PCBA Development
Glossary:
- PCB - Printed Circuit Board - A board with conductive tracks on which electronic components are installed.
- PCBA - Printed Circuit Board Assembly - A PCB after all the components have been installed.
- SMD - Surface Mount Device - Electronic components that can be surface mounted on a PCBA instead of through-hole pins (like traditional switches).
- SMT - Surface Mount Technology - The method of placing SMD components on a PCB
To start with. Our basic design for a Hall effect switch PCBA remained the same. Jeroen was able to copy nearly everything from our original design but had to deal with the following:
- The sensor placement is on the PCB bottom-surface.
- The sensor to magnet distance is larger.
- The magnet inside the switch is "stronger" (higher gauss).
- LED SMD is on the PCB bottom-surface.
Jeroen started by making a small test board with 4 keys using our original concept, but now with all the components mounted on the bottom side.
Because everything is mounted on the PCB bottom-surface, the LED SMD had to be reversed. This means the LED faces the PCB, shining through a hole made in the PCB. It's pretty cool.
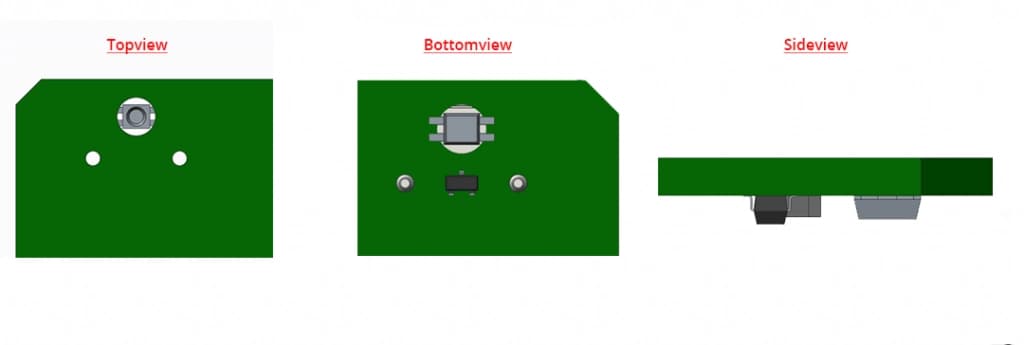
The stronger magnet inside the switch compensated for the larger distance between the sensor and magnet. However, Jeroen noticed that there was room for improvement, and he increased the sensitivity of the sensor.
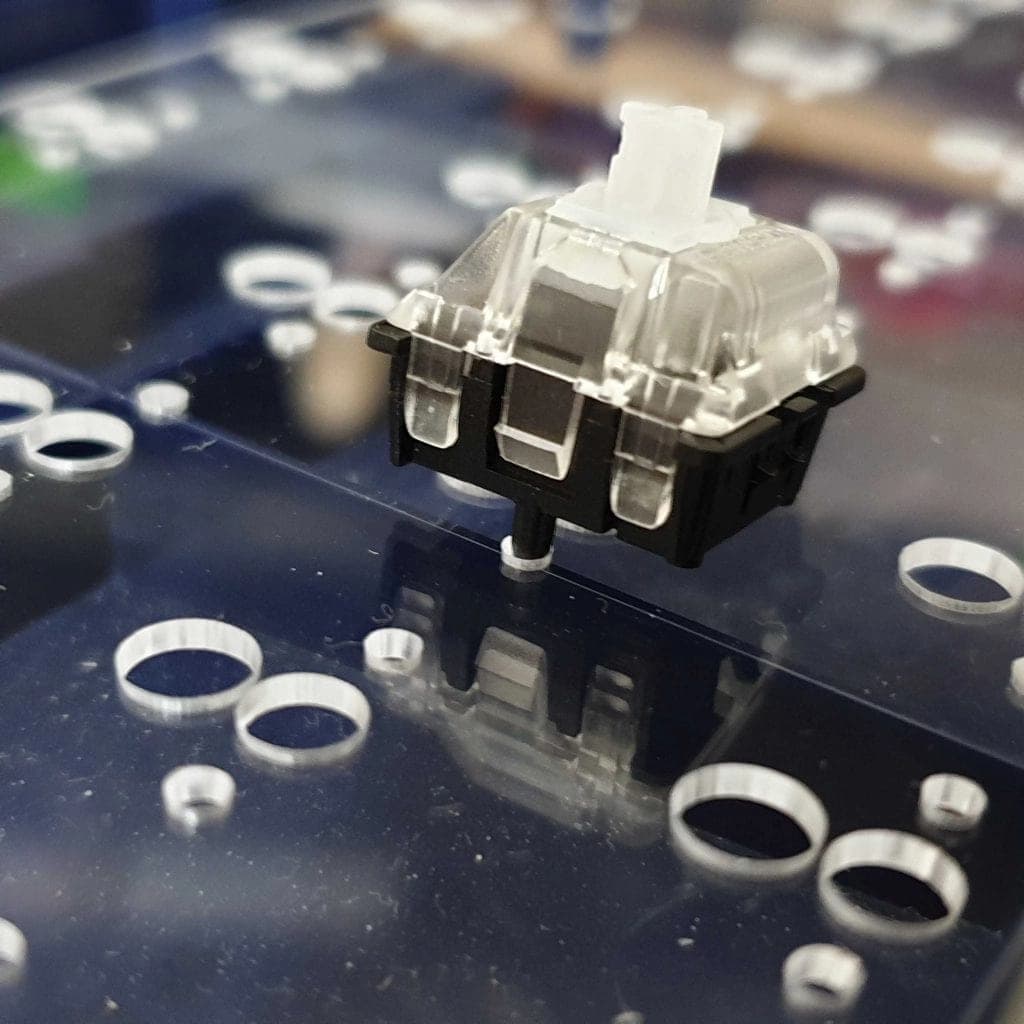
As mentioned before, the switch has these plastic pins sticking out from the bottom to align them on the PCB. This is a bit tricky because there was a lot of confusion about the Wooting two key alignment. Kevin found out earlier this year that the 3D drawings didn't 100% match the final Wooting two... We noticed this when we made the Lekker switch PCBAs, and Kevin spent a lot of time investigating the issue.
It didn't make it any easier when the factory consistently failed to give us final, accurate 3D drawings. It had a slight misalignment, very hard to find out. Kevin, however, was able to determine the issue. He spent a lot of time to double-check and modify every key alignment, switch position, and hole placement.
He even went as far as making an acrylic PCB placeholder to double-check everything.
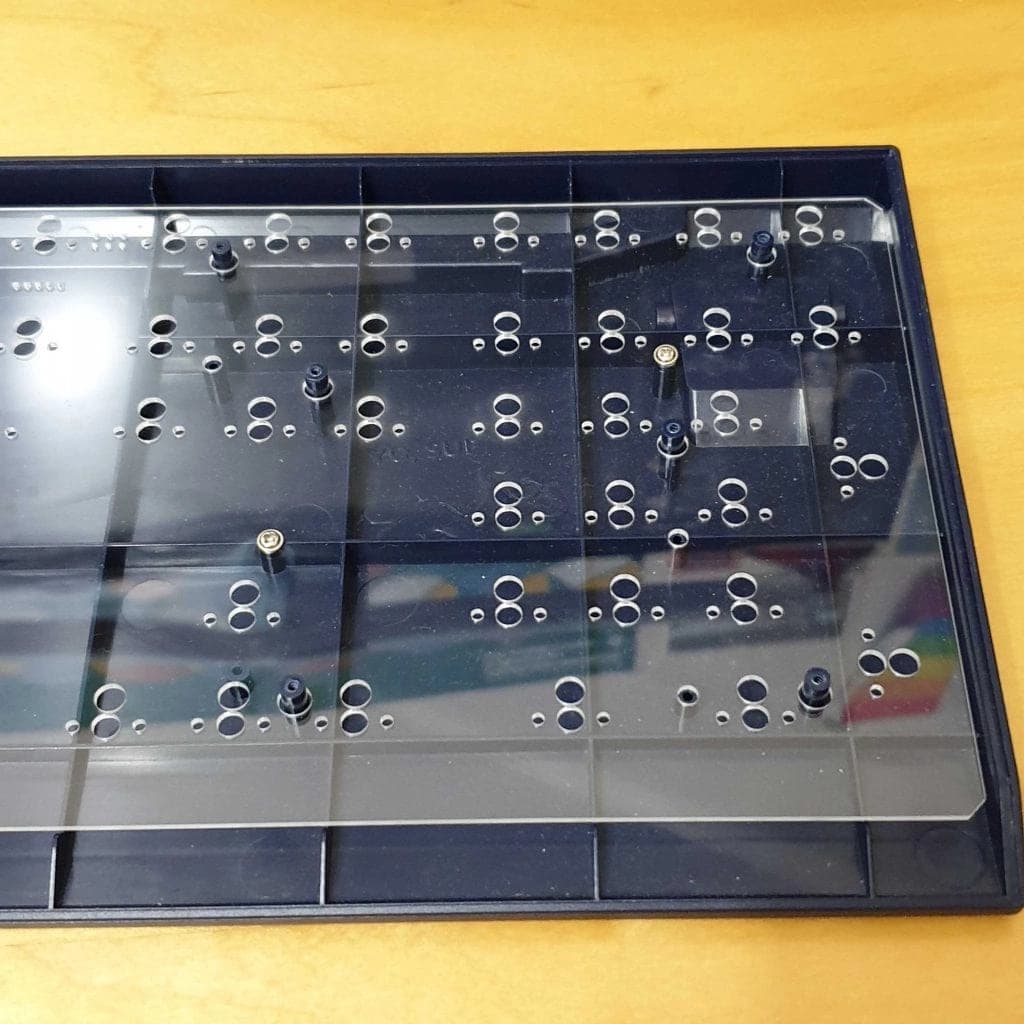
We still work with mPower for the Hall effect sensor, that hasn't changed. These guys have shown excellent support during the entire process. We're thankful to work with them and I'm quite certain this will prove extremely valuable for both of us going forward.
Jeroen recently approved all the changes on the 4-key PCBA and we're creating the new keyboard PCBA. Since it's technically nearly the same PCBA, I don't expect any major issues. At best an oversight or human error that needs correcting.
Sooooo, we cool? Ahhh, well here comes the real kicker.
Wooting two mold
Since everything is SMT to the bottom side of the PCB, it impacts the Wooting two bottom case. The bottom case wasn't made for and doesn't provide the space for bottom side SMD parts.
Then there are those 2 plastic pins that go straight through the PCB and stick out about 1mm.All these parts collide with the ribs of the Wooting two bottom-case and make it impossible to assemble. Oops?
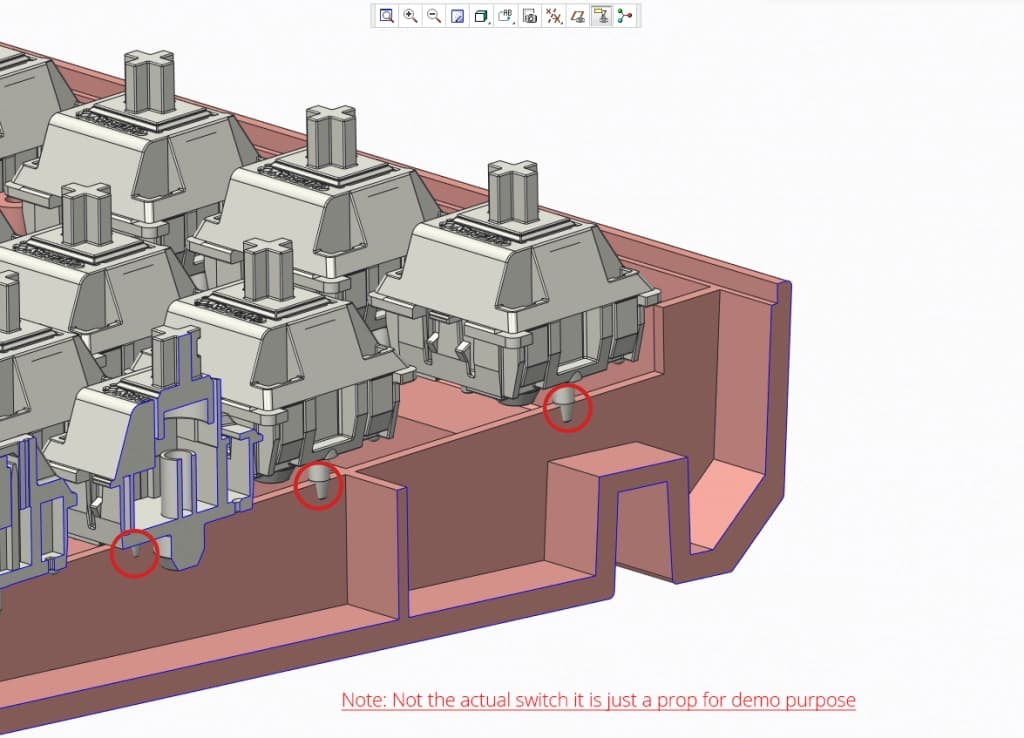
It's not unusual to modify a mold; we should be able to modify the few areas that collided with the ribs. That was until Kevin found quite a lot of collisions.
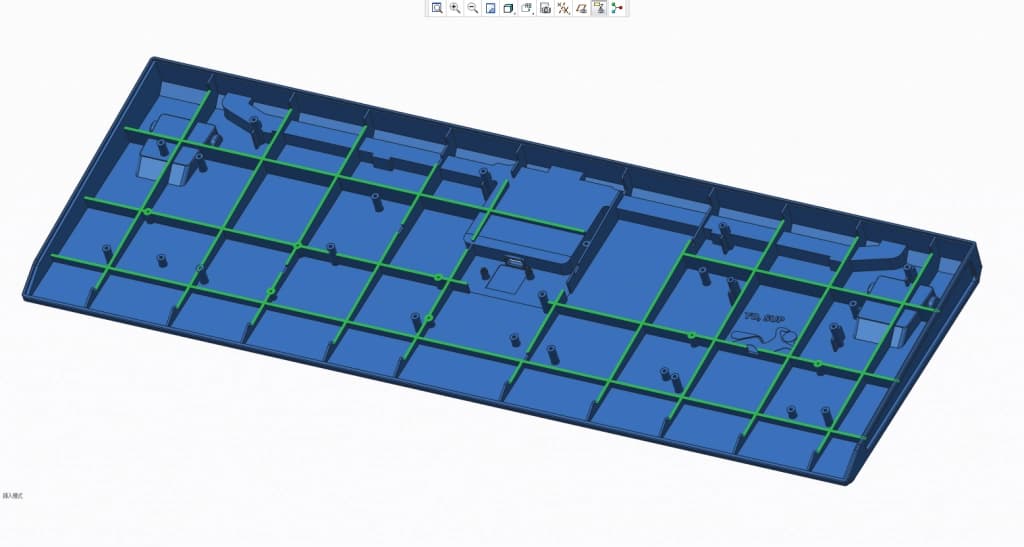
When we discussed the issue with our new assembly manufacturer, they advised us to open a new partial mold instead. Redesign the entire inside structure of the case instead of modifying the existing mold.
To explain how this works. A plastic injection mold exists out of a female and male mold cast. The female cast depicts the outer shape of the case and the male cast depicts the inside shape of the case.
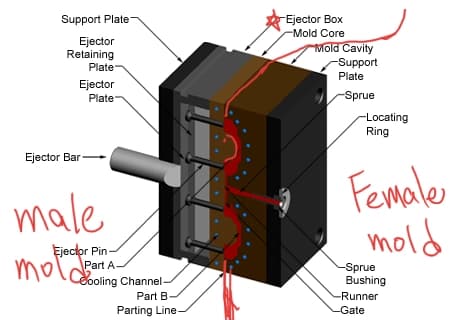
When plastic flows into the mold, it flows between the male and female cast. In our case, we need to replace the male cast. This is of course much more time and cost-efficient than opening an entirely new mold.
Had I mentioned how extremely grateful I am to have Kevin on board? He's upping Wooting's game and transforming ideas into realities.
Kevin spent countless hours working on the new 3D drawing. I had mentioned earlier that the factory consistently failed to give us final, accurate 3D drawings. To date, they've still failed.
Regardless, Kevin is a super-human and was able to reproduce everything based on a multitude of context information.
We decided to not redesign the entire inside structure of the Wooting two bottom-case. Instead, we lowered down all the ribs, modified and improved few areas, and told the yo sup guy what we did.
Kevin and I are very hesitant to relocate the ribcage because it heavily influences how the plastic flows and the part is ejected from the mold. We want to deduct problem variables, not add them. By taking this route, we potentially prohibit other switch types to fit in the Wooting two.
The new male mold cast needs to be made by the original mold factory. We already got a quote, lead time (20 days), and confirmation on the possibility. Kevin already sent out the final 3D drawing for review. If this is approved, we can start to ship the mold and start the process.
The Timeline
Don't do this to me! I really would love to set a new timeline, but I don't want to burn my fingers again. I rather focus on the next major milestone, the trial production. Once that's done, I can release an accurate timeline.
The trial production is a pre-production that validates the entire product assembly. This is where we can find potential issues before mass production takes place.
There're 3 dependencies:
- The new male mold cast (= bottom-case).
- The new keyboard PCBA.
- Purchasing parts.
The changes to the mold itself should take 20 days. We need to take into account the transport time and at least 1 revision. I'd put this at 45 days from now before it's ready for mass production.
I expect a PCBA working sample in about 25 days. The drawing should finish fast, but I suspect we'll have a slight delay in acquiring all the parts. Then I always expect at least 1 revision, this should bump it up to 40 days.
Purchasing, a lot of parts can already be purchased ahead of time and parts with dependencies can be purchased at a small quantity for trial production. If you look at purchasing a large amount for mass production, it's good to take 30-60 days into account. This usually happens once a trial production date is set.
That sets us roughly 2 months from trial production. If trial production proves successful, we can quickly get into mass production. It'll depend on our assembly factory.
Monthly blog update, bi-weekly livestream, and a continuous conversation on discord will keep you as informed as possible during the entire process. At any time, you can send out an email to social@wooting.io to ask questions.
Update 31st of May: I heard you, we will publish a new timeline of the Lekker Project page this coming June week.
Final words
It's crazy how this project has developed from what I thought was seemingly straightforward to a major challenge like the original Wooting one. But I can notice one key difference between us now and that time.
We're a lot more confident, capable, and wiser in the decision-making process. We've already been thrown from the one to the other challenge monthly. Challenges that were/are often simply bigger than our experience and knowledge combined. But we always get through them because we don't give up, learn/absorb as much as possible, and know that we're not alone.
You — some even starting from the Wooting one — have always supported us. You didn't give up on us, shown patience, and motivated us to keep moving forward. Without you, there wouldn't be a Wooting, we would have no right to exist.
I'll stop it there before I get too cheesy on the subject. I'm just extremely grateful for how positive everybody is and want to let you know it doesn't go unnoticed.
I invite you to join today's twitch livestream at 15:00 (CET), Amsterdam local time. We'll go into more detail, answer questions, and show a thing or two. Otherwise, you're welcome to join the conversation on twitter or leave a comment below.
<3,Calder,Team Wooting.
Update 31st of May: Added text to further clarify the points communicated. Added a small FAQ (below).
FAQ
I'm confused, is it still an analog input keyboard?
It's still the same as advertised analog input keyboard using Hall effect switches, all features, and promises intact. The difference now is instead of using the Lekker (Huano) magnet switch, we use the Gateron magnet switch.
The magnet switch is only a piece of the puzzle, a means to an end, but not the deciding factor if features work or not.
Wait, wasn't this whole project about the Lekker switch?
The Lekker switch development was a central point of the project but it was only a piece of the puzzle. The Hall effect sensor, PCBA design, and firmware/software development play an even more important role to complete the puzzle. The switch is only a means to an end. It was easier to focus the message on.
We worked with Huano to develop the switch, but we did not design it from the ground up. We took an existing Huano switch they had already developed and modified it for analog input. This is what we branded the Lekker switch.
However, we don't want to be a switch manufacturer and would still heavily depend on Huano. We made the Lekker switch as a necessity to make progress, otherwise, nobody (including Huano) would, not because we wanted to dominate the market, get exclusivity, or earn a bunch of money on selling switches.
Now that we will use the Gateron magnet switch, we didn't need to modify their switch for analog input and didn't see a good reason to rebrand it. It works exactly how we need it and Gateron is reputable, produces good quality, and is familiar to the keyboard community.
We plan to customize the Gateron switch stem and spring to give it our "Lekker" influence. I will get more into this in a future update.
Wait, then what makes the keyboard unique if it doesn't use Lekker switches?
When we take a closer look at the switch. A Hall effect switch exists out of 2 separate parts.
- A magnet switch axis. This is the key you press on the keyboard and is clicked onto a switch plate. This itself is basically a button with a magnet inside.
- Hall effect sensor. This is a sensor place underneath each magnet switch. It detects and reads the position of the magnet in the switch.
In this case, we exchanged the magnet switch axis, but we still use the same Hall effect sensor as before. A big part of this development.A good analog input keyboard doesn't stop at its switches. The Hall effect sensor, PCBA design, firmware, and PC software play a huge role. The hardware parts decide the quality of the analog signal, the software part decides the utility of analog input.
This also means that comparing different keyboards using the same magnet switch, says nothing about the quality or experience of the keyboard.
Not so much different as all those different keyboards using the same Cherry switches but then a level deeper and more complicated.
© 2015 - 2025 Wooting technologies版权所有。